
For the second part of this Getting started Xamarin with Prism series, I would like to discuss on how to use Command in Xamarin forms. By the way if you missed the Part 1 of this series you can check this article.
Command
When you say Command, for example in Win Forms it’s just an event that was fired
due to let’s say a button click or an event brought by textbox lost/on focus but in Xamarin
Commands are just methods that are directly binded from your view e.g. (Button, MenuItem, ToolbarItem) and executes the binded method in your ViewModel.
Now let’s use Prism’s Command implementation, will still be using our previous solution “XamarinPrismSample” that we have created in the first part of the series. Let’s modify our MainPage.xaml, let’s put the stack layout in the Grid and add a label which is binded to Greeting. Will also add a button where in when user clicks it, will display the most famous words “Hello Word” in our label with the Greeting binding as shown in Figure 1.

Let’s try to build our application and see the current User Interface in Figure 2.

Now let’s go to our MainPageViewModel to setup the contents of our binding for our Command and Property. For Prism implementation of Command, it uses DelegateCommand Class. But first we need to declare a property called Greeting and implement it’s Getter and Setters. As you can see it doesn’t uses the INotifyPropertyChanged but instead implements the BindableBase which is the Prism own way of implementing the INotifyPropertyChange interface. Kindly see Figure 3 for the property implementation.

So after implementing our Property Greeting, let’s try to implement a simple command where in if the user clicks the button it will update the display of our Greeting to Hello World. Will create another property but this time it’s of type DelegateCommand which the Prism framework is using. Then create it’s delegate method by setting the Greeting property to “Hello World” string as shown in Figure 4.

When user clicks the button it will show Hello World string in your U.I. as shown in figure 5.

Now let’s say you want to enable your button when the user types something on your Edit control because by default we set our CanExecute to return true always. So let’s add an Edit Control to our U.I.

In order to enable our Button when someone inputs something in our Edit Control we need to return a Boolean result based on the Name property if it is empty or not.

Figure 7. Modifications of CanExecute
Now let’s try to run our application, then try to type something in our Edit Control and we should expect that our button should be enabled….. hmmm… but our Button is still disabled even though our Edit Control already contains a string.

It’s a general rule when something is updated in your View side the bindings should be updated through your properties like for example the INotifyPropertyChanged and for the Command you should call the RaiseCanExecuteChanged method to update the button.

Let’s try again to run our application and type something in our Edit Control…. and boom… our button is automatically enabled.

Well it’s good that our button is already being triggered by our Edit Control… but what if you don’t want to add additional codes in your setters, this is where Prism Delegatecommand ObservesProperty method comes in. It allows you to Observe a property and it’s following changes. So we need to remove the calling of RaiseCanExecuteChanged in our setter and instead use ObservesProperty and pass a function which observes the Name property like in Figure 11.

Now let’s try to run our application and try to type something in our Entry Control…. then boom… same result it still enables our button with the luxury of a more cleaner setter.

For the last part of this article, I would like to discuss about using the Command Parameter feature of Prism. Let’s try to modify our Button first by adding a Property Called ButtonName then bind it to our text attribute then let’s add a CommandParameter and bind it to the Name property so that whatever value of the Name property will pass it to our DelegateCommand.
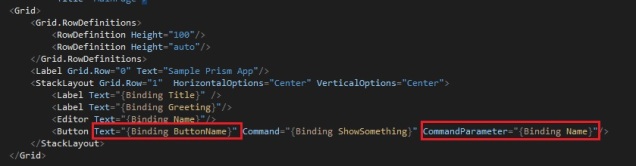
Next up is to edit our DelegateCommand by adding a type string and also adding string parameters for our ShowHelloWorld and CanExecute methods.

Now let’s try to run our application and type in our edit control, once you click the button the Content of the button should be equal to the content our Edit control…. yup there you have it our edit control and button control have the same Content using the CommandParameter of our DelegateCommand.

Conclusion
Just a quick wrap up, we have learned about using the Delegate Command of prism. We used the ObservesProperty method of our delegate command in order to observe a property without additional codes in our setters. We also discussed about the Command Parameters by using the the type T of our Delegate Command. So that’s it I hope it helped you to kick start your Xamarin Forms adventure and the next part I’ll try to discuss about Navigations.
Happy Coding 🙂
